
Step-by-Step Guide to Headstone Cleaning: Restoring Memories with Care
Introduction
Cleaning a headstone is a thoughtful and meaningful way to preserve the memories of our loved ones and honor their legacies. However, it's important to approach the cleaning process with care and the right techniques to avoid causing damage. In this step-by-step guide, we will walk you through the process of headstone cleaning, ensuring that you restore its beauty while maintaining its integrity. Let's explore each step in detail, enabling you to undertake this task with confidence.
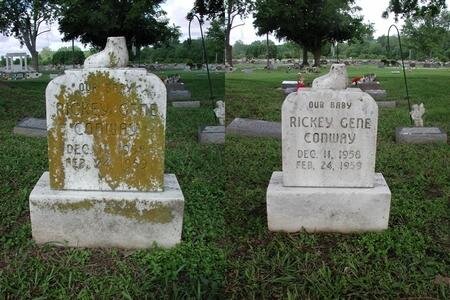
Before and after image post cleaning.
Step 1: Assess the Headstone:
Before starting the cleaning process, carefully examine the headstone. Note its material, condition, and any existing damage. This assessment will help you determine the appropriate cleaning methods and products to use. Take pictures to document the before and after stages, allowing you to track your progress.
Step 2: Gather the Necessary Supplies:
Collect all the supplies you'll need for headstone cleaning. This includes soft-bristled brushes, natural sponges, buckets of clean water, a pH-neutral stone cleaner or mild soap, a plastic scraper or wooden stick, and non-abrasive cleaning cloths or towels. Ensure that the tools you choose are specifically designed for delicate stone surfaces.
Step 3: Pre-Rinse the Headstone:
Before applying any cleaning solution, thoroughly rinse the headstone with clean water. This helps remove loose debris, dirt, and pollutants. Gently spray the entire surface of the headstone, ensuring that it's evenly dampened.
Step 4: Apply the Cleaning Solution:
Prepare a solution of the recommended stone cleaner or mild soap diluted in water, following the manufacturer's instructions. Dip a soft-bristled brush or sponge into the solution and apply it to the headstone. Work in small sections, applying gentle pressure and using circular motions to remove stains and dirt. Avoid scrubbing too vigorously to prevent surface damage.
Step 5: Address Stubborn Stains or Biological Growth:
For stubborn stains or biological growth like moss or lichen, use a plastic scraper or wooden stick to gently dislodge them. Take care not to scratch the headstone. If necessary, repeat the cleaning solution application and use a soft brush or sponge to scrub the affected area gently. Patience and a gentle touch are key to avoiding any damage during this step.
Step 6: Rinse Thoroughly:
Once you've cleaned the entire headstone, thoroughly rinse it with clean water. Ensure that all traces of the cleaning solution are removed to prevent any potential residue build-up. Use a gentle stream of water or a clean sponge to rinse the surface, paying attention to any crevices or engraving.
Step 7: Dry the Headstone:
Allow the headstone to air-dry naturally. Avoid using towels or cloths to dry the surface, as they may leave lint or cause scratches. Give the headstone ample time to dry completely before proceeding.
Step 8: Optional: Apply a Stone Protector:
If desired, you can apply a stone protector or sealer to the headstone after it has thoroughly dried. Follow the manufacturer's instructions and apply the product evenly to provide an additional layer of protection against weathering and staining.
Step 9: Document and Admire the Results:
Take pictures of the cleaned headstone to document your efforts and compare the transformation. Admire the restored beauty and the meaningful impact of your cleaning process, knowing that you've contributed to preserving the memory of your loved ones.
Conclusion
Cleaning a headstone is a labor of love that allows us to honor and remember those who have passed. By following these step-by-step instructions, you can effectively clean a headstone while ensuring its long-term preservation. Remember to approach the process with care, using gentle tools